

共计 7268 个字符,预计需要花费 19 分钟才能阅读完成。
一、创建项目
npx create-next-app@latest二、基于文件的路由机制

三、动态路由参数
注意:在匹配 URL 时,静态路由优先权大于动态路由
1、基础使用

http://localhost:3000/about/1
http://localhost:3000/about/1
import {useRouter} from 'next/router'  // 引入钩子函数

export default function AboutProjectPage() {const router = useRouter()  // 使用钩子函数

  return (
        About Project. The id is: {router.query.id}  // 获取动态路由参数

    >
  )
}
2、多层路由参数
还可以使用多层的路由参数


3、多个参数


![]()
变成数组

四、路由跳转
1、Link
(1)、基本使用
import Link from 'next/link';  // 引入

  // 使用
  首页
(2)、传入 UrlObject
interface UrlObject {
    auth?: string | null | undefined;
    hash?: string | null | undefined;
    host?: string | null | undefined;
    hostname?: string | null | undefined;
    href?: string | null | undefined;
    pathname?: string | null | undefined;
    protocol?: string | null | undefined;
    search?: string | null | undefined;
    slashes?: boolean | null | undefined;
    port?: string | number | null | undefined;
    query?: string | null | ParsedUrlQueryInput | undefined;
}
2、编程式导航(router.push、router.replace)


3、404 页面
pages 文件夹下创建特殊文件 404.js,Next.js 将会在返回 404 错误时,自动加载组件。
相当于用户可以自定义 404 页面。
五、静态文件
根目录 public 目录下放静态文件,Next.js 会自动处理,放在这个文件夹外的静态文件是无法获取到的。
六、css 模块
1、组件样式
Next.js 通过 js 组件的名称.module.css 文件命名约定来支持 CSS 模块。
只影响所绑定的那个组件

2、全局样式
在根目录下的 styles 写 globals.css

引入
![]()
七、SSG
SSG 是静态站点生成,就是在文件打包阶段,预先生成页面。
Next.js 默认会预渲染所有没有动态数据的页面,而动态的数据还是像 React 一样在客户端渲染的。
如果要在 HTML 源码中展现动态数据,可以使用 page 下 getStaticProps 方法。这个方法是跑在服务端环境下的,可以在服务端获取数据并渲染,并且客户端不会收到方法内任何的代码。
此外,Next.js 拓展了一些功能,比如 fetch 是浏览器的接口,在服务端是不能用的,而在 getStaticProps 方法中是可以使用 fetch API 的。
1、getStaticProps
getStaticProps 方法返回值类型如下,一共有三种情况:
export type GetStaticPropsResult =
  | {props: P; revalidate?: number | boolean}
  | {redirect: Redirect; revalidate?: number | boolean}
  | {notFound: true; revalidate?: number | boolean}
(1)、基本使用

一般正确获得数据后,返回值是第一种情况。
(2)、revalidate

(3)、redirect、notFound

获取数据失败时,引导用户进行下一步操作,重定向或直接返回 404 错误。
(4)、获取动态路由参数(context)

pages/[pid].js

无法跳转到[pid].js
因为 [pid] 是动态的,nextjs 无法提前渲染
要借助 getStaticPaths
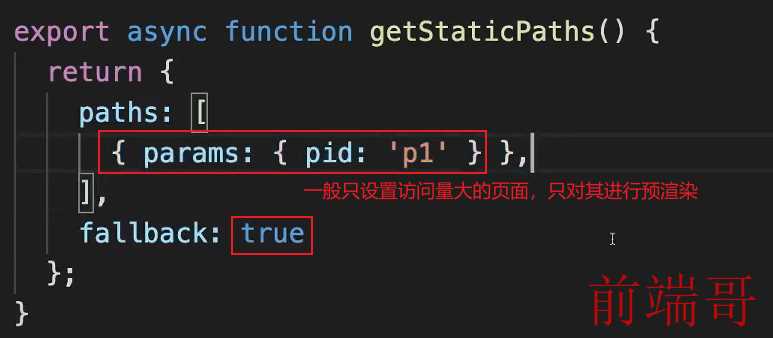
2、getStaticPaths
文件名带 [] 的 js 如果需要生成静态页面,需要使用 getStaticPaths 方法。
getStaticPaths 方法定义了一组需要生成静态页面的列表,每项数据都会调用 getStaticProps 来获取数据,所以要使用 getStaticPaths 一定先要有定义 getStaticProps。
(1)、基本使用
pages/[pid].js

此时打开页面,是将所有的 json 全部发送给浏览器

(2)、fallback
- fallback 值为 false 时,如果 URL 请求参数不在 paths 属性中定义了,那么会直接返回 404 页面。
- fallback 值为 true 时,如果通过 Link 组件在页面中导航,那不会有问题。但是如果是直接在 URL 中访问未在 paths 中列出的路径,会直接报错,需要在 React 组件中判断对应 props 的参数,在服务器还未准备好时,先返回一个加载中的提示。
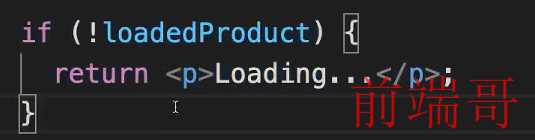
- 除了布尔值,fallback 还可以赋值为 ‘blocking’,请求页面时如果数据未准备好就阻塞请求,等待页面渲染完毕后再返回页面。相比第二种情况,相当于免除了组件中判断这一环节。


fallback 值为 true 时,如果访问不存在的请求路径,就可以在 getStaticProps 中直接返回 {notFound: true} 来返回 404 页面。
八、SSR
SSR 是服务端渲染,getServerSideProps 方法可以针对每次请求作出处理,适用于数据变化比较频繁的页面。
getStaticProps 与 getServerSideProps 只能 二选一。
getServerSideProps 也是运行在服务器上的方法,这个方法的参数 context 可以完整获取请求的所有数据,context 的类型如下:
export type GetServerSidePropsContext = {
  req: IncomingMessage & {cookies: NextApiRequestCookies}
  res: ServerResponse
  params?: Q
  query: ParsedUrlQuery
  preview?: boolean
  previewData?: D
  resolvedUrl: string
  locale?: string
  locales?: string[]
  defaultLocale?: string
}
getServerSideProps 返回值类型:
export type GetServerSidePropsResult =
  | {props: P | Promise }
  | {redirect: Redirect}
  | {notFound: true}
getServerSideProps 的返回值类型基本同 getStaticProps,只是少了 revalidate 属性,因为 getServerSideProps 会对每次请求进行重新渲染。
(1)、基本使用

九、不适合预渲染的情况
- 数据变化非常频繁的页面(比如股票数据)
- 与用户身份高度耦合的页面(比如用户最近 xxx 的 xxx)
- 页面中只有某一小部分数据不同的情况
碰到这些情况,还是在客户端使用 useEffect 中 fetch 来获取数据,Next.js 团队也编写了一个 React 钩子库 SWR(https://swr.vercel.app/zh-CN)来简化客户端请求,示例如下:
每次当页面获得焦点时,swr 钩子都会重新发送请求获取数据
npm i swrimport useSWR from 'swr'
const fetcher = (...args) => fetch(...args).then((res) => res.json())
function Profile() {const { data, error} = useSWR('/api/profile-data', fetcher)
if (error) return Failed to load
if (!data) return Loading...
return (
{data.name}
{data.bio}
)
}十、增加 Meta 信息
1、基本使用

2、Head 组件复用


3、全局通用 Head
全局通用的 Head 组件可以添加在 _app.js 这个文件中。此外,相同的头标签会合并,合并的规则就是最后渲染的 Head 覆盖之前渲染的 Head。

另一个全局特殊 JS 文件是 /pages/_document.js,这个文件的默认值如下:
import {Html, Head, Main, NextScript} from 'next/document' export default function Document() { return () }
_app.js 这个文件相当于 body 中的内容,_document.js 相当于整个 HTML 文档,比前者更“外面”。注意这里的 Head 组件的引入包与普通页面引入的包不同,不要搞错。
十一、图片优化
Next.js 提供了优化图片的方案——Image 组件。
使用 Image 组件有四点好处
- 对各个设备使用合适的尺寸与格式(使用 Chrome 访问页面时,图片会转换成 webp 格式)
- 防止 Cumulative Layout Shift(累计布局偏移)
- 图片在视图中才会被加载
- 可以自定义图片尺寸
// ...
import Image from 'next/image'
export default function About(props) {
return
{/* ... */}
![图片]() >
}
>
}Next.js 会根据 Image 的 width 与 height 值,在页面请求服务端时,转换并缓存相应大小的图片。
十二、API 路由
/pages/api 文件下的 JS 文件不会导出页面组件,Next.js 会将这些文件映射成 /api/* 的 API 端点。Next.js 团队在 NodeJS 的 http 模块之上封装,提供了类似 express 的 web 服务器开发功能。
我们可以在这这些文件里写服务端的逻辑,同 getStaticProps 方法一样,这些逻辑客户端是看不到的。
这些 API 路由的基本格式如下:
export default function handler(req, res) {if (req.method === 'POST') {// 处理 POST 请求} else {// 处理其他 HTTP 方法请求}
}
1、基本使用
pages/index.js

post 请求

get 请求

pages/api/feedback.js
post 请求


get 请求

2、动态 api 路由


使用

十三、部署 Next.js
1、构建
构建 Next.js 应用有两种方式:
(1)、next build
第一种是“标准构建”,使用命令 next build 构建,课程之前构建都是使用这种方式。
使用这种方式构建,我们会得到优化后的前端项目 + 一个 NodeJS 服务端程序。这个服务端程序提供了 API 路由、SSR 与页面重验证等功能。所以如果要部署这个应用,需要服务器有 NodeJS 环境。
(2)、next export
第二种构建方式是静态打包,使用命令 next export 构建。
使用这种方式生成的代码,只会包含纯前端的内容,HTML、CSS、JS 以及静态资源。没有 NodeJS 服务端程序,所以部署可以不需要 NodeJS 环境。当然这样的话,API 路由、SSR 等 Next.js 提供的特性就不能使用了。
2、配置
项目根目录 next.config.js 文件,可以对 Next.js 进行配置。
/** @type {import('next').NextConfig} */
const nextConfig = {reactStrictMode: true,}

module.exports = nextConfig
这个文件中的代码也是服务端代码,在构建过程中以及构建生成的 NodeJS 服务端程序中会使用到。此外这个文件不会被 Webpack, Babel 或 TypeScript 处理,所以确保使用与机器 NodeJS 版本相匹配的语法。
具体配置项看官方文档
十四、加密
课程使用 bcryptjs 包来实现加密逻辑,通过下列命令安装:
npm i bcryptjsbcryptjs 包我们只要关注两个函数,分别是加密 hash 和比较 compare。注意两个方法都是异步的。
import {hash, compare} from 'bcryptjs'

// ...

// 通过 hash 函数加密明文密码
const hashedPwd = await hash(pwd, 12)

// ...

// 通过 compare 函数比较两个密码是否相同,返回布尔值
const isValid = await compare(newPwd, hashedPwd)
十五、鉴权
npm install next-auth1、后端生成 jwt 令牌
next-auth 包提供了前后端鉴权需要的逻辑,在 API 路由中,创建特殊文件 /api/auth/[…nextauth].js,在文件内引入 next-auth 包并实现相关逻辑:
import NextAuth from "next-auth"
import CredentialsProvider from "next-auth/providers/credentials"

export const authOptions = {
    providers: [
        CredentialsProvider({
            name: 'Credentials',
            session: {strategy: "jwt",},
            async authorize(credentials, req) {
                // 自己实现验证逻辑
                const res = await fetch("/your/auth", {
                    method: 'POST',
                    body: JSON.stringify(credentials),
                    headers: {"Content-Type": "application/json"}
                })
                const user = await res.json()

                // 一切正常返回用户信息
                if (res.ok && user) {return user}
                // 用户信息没获取到就返回 null
                return null
            }
        })
        // ... 其他 providers
    ],
}
export default NextAuth(authOptions)
2、在前端组件中,使用 next-auth/react 模块的 signIn 函数登录
import {signIn} from "next-auth/react"
export default () => 3、客户端通过 useSession 钩子获取鉴权信息
import {useSession} from "next-auth/react"
export default function About(props) {const { data: session, status} = useSession()

    console.log('session', session)
    console.log('status', status)

    return
        {/* ... */}
    >
}
v4 版本 next-auth 需要 SessionProvider 才能使用上面这个钩子,在 _app.js 中增加相关代码:
import {SessionProvider} from "next-auth/react"
import '../styles/globals.css'

export default function App({Component, pageProps: {session, ...pageProps},}) {return


}
4、使用 next-auth/react 模块的 signOut 函数登出用户:
import {signOut} from "next-auth/react"
export default () => 十六、路由守卫
在客户端侧,可以使用 getSession 获取当前的鉴权信息,在需要权限的页面,可以判断 session 的值进行进一步操作。
在服务端侧,可以在 getStaticProps 方法中使用 unstable_getServerSession 函数来获取 session,v4 版本中,getSession 不可以在服务端使用。
import {unstable_getServerSession} from "next-auth/next"
import {authOptions} from "./api/auth/[...nextauth]"

export async function getServerSideProps(context) {
  return {
    props: {
      session: await unstable_getServerSession(
        context.req,
        context.res,
        authOptions
      ),
    },
  }
}
原文地址: Next.js 入门教程


